

C2 Private Platform Documentation
Table of Contents
External Login
Some Collective2 partners manage their own external web sites, but want to let their users log in from that web site to a Collective2 white-label or private platform site. We have made it easy to include login links from anywhere within your own site, even if your own site runs on a separate domain or subdomain.
To use cross-site login, your web master will need to be able to change the HTML content on the web pages from which you want to enable C2 login.
Include javascript files in HEAD of document
Your HTML page will need to include two javascript files. One of these files is Collective2's external login javascript library (externalc2.js), and the other is the latest version of the jQuery library. (jQuery is a popular javascript open-source framework.)
Note Many web sites already use jQuery. If yours does, then you may not need to add anything to your HTML to support jQuery. However, if you do not see a reference to jquery.min.js or jquery.js in your web pages, then you will need to include a link to that library in order to support C2 Login.
For jQuery, we recommend linking to Google's public-domain CDN at the following address:
<script src="/js/lib/jquery/jquery/1.10.2/jquery.min.js"></script>
For the Collective2 cross-site login library, we recommend linking to:
<script src="//www.collective2.com/js/externalc2.js"></script>
We recommend using whichever variant of the collective2.com domain that your own white-label site uses. For instance, if your white-label site is reachable through
myprivatesite.autotradenow.com, you should link to //myprivatesite.autotradenow.com/js/externalc2.js.
Both these links to javascript files should be included in your document's "HEAD" section.
Make login links
To allow users to log in to your privately-branded C2 site, just add a javascript link to some page element. You might want to allow users to log in by pressing a button, or, alternately, you might have a simple text link that says "Log In". Here is an example of the latter:
<h1>Welcome to our amazing web site!</h1>

<p>We have lots of content available here on this web site, but perhaps you'd like to log in
to Collective2? <a href="#" onclick="callC2Login(this,1234);return false;">Log in to C2</a>.</p>
Essentially, you are calling a javascript routine (callC2Login), which takes care of the C2 login process. Notice that you need to pass into this routine your Collective2 White-Label Site ID Number. (The example shown here is 1234, which is not a real site id number.) If you don't know your site's ID number, please contact the C2 Help Desk and we'll let you know what it is.
Summary
Putting it all together, here is an example web page that allows a Collective2 white-label site login:
<html xmlns="http://www.w3.org/1999/xhtml" xml:lang="en" lang="en" >

 <head>
    <title>Your Web Site</title>

    <script src="/js/lib/jquery/jquery/1.10.2/jquery.min.js"></script>
    <script src="//www.collective2.com/js/externalc2.js"></script>
 </head>

 <body>
   <h1>Welcome to our amazing web site!</h1>

   <p>
	 We have lots of content available here on this web site, but perhaps you'd like to log in to
	 Collective2? <a href="#" onclick="callC2Login(this,1234);return false;">Log in to C2</a>.
   </p>

 </body>
</html>
External Registration
Some Collective2 partners manage their own external web sites, and want to let their users register for their Collective2 white-label or private platform site from the external, non-C2 web site. We have made it easy to include registration links from anywhere within your own site, even if your own site runs on a separate domain or subdomain.
To use cross-site registration, your web master will need to be able to change the HTML content on the web pages from which you want to enable C2 registration.
Include javascript files in HEAD of document
Your HTML page will need to include two javascript files. One of these files is Collective2's external login/registration javascript library (externalc2.js), and the other is the latest version of the jQuery library. (jQuery is a popular javascript open-source framework.)
Note Many web sites already use jQuery. If yours does, then you may not need to add anything to your HTML to support jQuery. However, if you do not see a reference to jquery.min.js or jquery.js in your web pages, then you will need to include a link to that library in order to support C2 Login.
For jQuery, we recommend linking to Google's public-domain CDN at the following address:
<script src="/js/lib/jquery/jquery/1.10.2/jquery.min.js"></script>
For the Collective2 cross-site login library, we recommend linking to:
<script src="//www.collective2.com/js/externalc2.js"></script>
We recommend using whichever variant of the collective2.com domain that your own white-label site uses. For instance, if your white-label site is reachable through
myprivatesite.autotradenow.com, you should link to //myprivatesite.autotradenow.com/js/externalc2.js.
Both these links to javascript files should be included in your document's "HEAD" section.
Make registration links
To allow users to log in to register for your privately-branded C2 site, just add a javascript link to some page element. You might want to allow users to log in by pressing a button, or, alternately, you might have a simple text link that says "Register for Free Account". Here is an example of the latter:
<h1>Welcome to our amazing web site!</h1>

<p>We have lots of content available here on this web site, but perhaps you'd like to register? <a href="#" onclick="callC2Register(this,1234,'trader');return false;">Register for Free Account</a>.</p>
Essentially, you are calling a javascript routine (callC2Register), which takes care of the C2 registration process. Notice that you need to pass into this routine your Collective2 White-Label Site ID Number. (The example shown here is 1234, which is not a real site id number.) If you don't know your site's ID number, please contact the C2 Help Desk and we'll let you know what it is.
In addition to the Site ID, you can also pass a parameter called customer flavor. This is a text string (between 1 and 40 characters) that you can use to mark, or "tag," your customers. Later, you will be able to display different customized text to customers with different flavors. Examples of flavors you might use: trader, system-developer, from-google-ad-22, etc. You can leave this blank by passing an empty string: ''
Summary
Putting it all together, here is an example web page that allows a Collective2 white-label registration:
<html xmlns="http://www.w3.org/1999/xhtml" xml:lang="en" lang="en" >

 <head>
    <title>Your Web Site</title>

    <script src="/js/lib/jquery/jquery/1.10.2/jquery.min.js"></script>
    <script src="//www.collective2.com/js/externalc2.js"></script>
 </head>

 <body>
   <h1>Welcome to our amazing web site!</h1>

   <p>
	 Perhaps you'd like to register? <a href="#" onclick="callC2Register(this,1234,'flavor text');return false;">Register for free account</a>.
   </p>

 </body>
</html>
Integrating External Commerce / Subscriptions
If you are using Collective2's Private Platform software, you are handling your own credit-card commerce for trading-system subscription processing. Our Private Platform API enables seamless integration between your C2 Private Platform and your own credit-card commerce engine.
First, let's review a typical user experience. Assume the customer is on your C2 Private Platform, in a registered/logged-in state, and is examining one of your trading systems. He might see a screen that looks like this:
Example of screen customer sees on Private Platform before subscribing
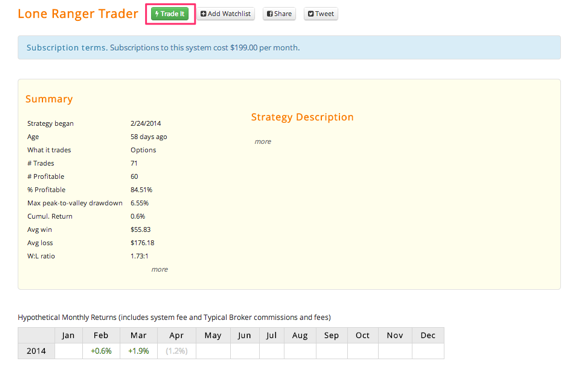
Next, the user presses the Trade It button.
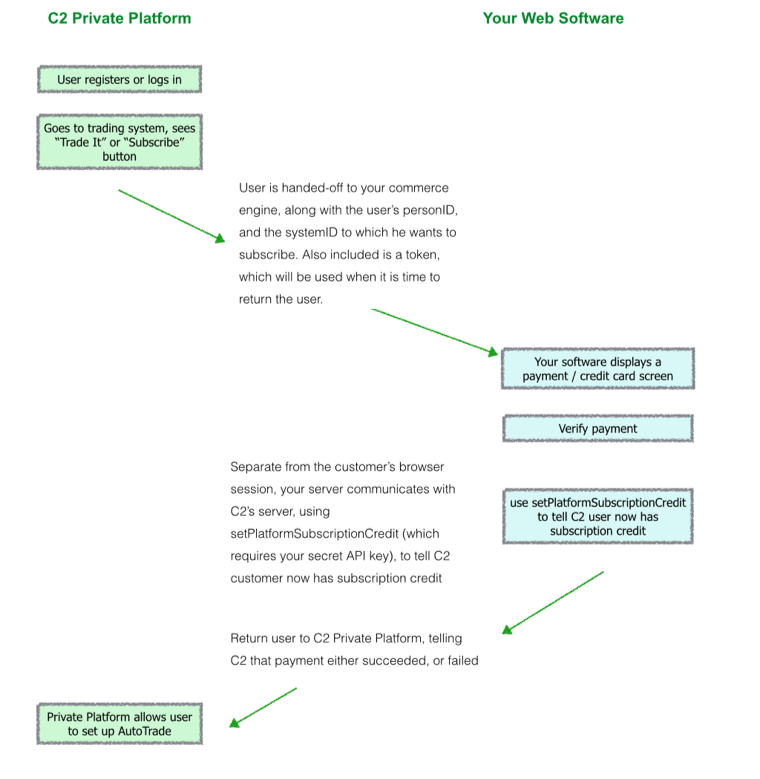
The first thing that happens is that C2 checks its database to see if the user already has subscription credit for the system in question. If not, C2 will pass the user to your server, where subscription processing can occur. The actual URL that C2 uses when sending customers to your server can be customized in your Platform Management screens. But a typical URL might look like this:
https://yoururl.com/handleSubscription/systemid=[SYSTEMID]&yourCommerceEngineSKU=[SKU]&personid=[PERSONID]&returnToken=[TOKEN]
C2 will pass the user to the URL above, using https (this is required, for security). We will include the systemid, and the personid (these two parameters will be useful to you when you use our Subscriber Management API to apply subscription credits to accounts), and finally, a return token. (Optionally, you can specify a SKU code, which is known by whatever commerce engine you use.) The return token is used when you are finished handling the credit-commerce, and it is time to return the user to the C2 Private Platform.
When you receive a user via the above handleSubscription call, you should display whatever payment or credit card screen is appropriate. When the commerce is complete, you need to do two things.
- Use setPlatformSubscriptionCredit to tell C2 that the user in question has subscription rights to the system. (This assumes commerce / credit-card processing was successful, of course.)
- Return the user to C2 so that he can continue the process of AutoTrade Setup.
To tell C2 that commerce was successful, you send the user back to a URL like this: https://yourc2.privateplatformdomain.com/returnfromhandoff/success/TOKEN - where [TOKEN] is the value C2 initially sent you in the returnToken= parameter.
To tell C2 that commerce was unsuccessful, you send the user back to a URL like this: https://yourc2.privateplatformdomain.com/returnfromhandoff/fail/[TOKEN]
Diagram of customer flow and hand-off.
Handling Unsubscriptions
When a user chooses to unsubscribe from a trading system, he typically starts that process from the C2-managed Private Platform site. In cases where your own billing software automatically bills users on a monthly basis, it is necessary that C2 alert your software about this unsubscription event, so that you can take whatever action is necessary on your side, to prevent further recurring billing.
The unsubscribe process looks a bit different than the initial subscribe. C2 will not pass the user's session to you, because there is no need for your software to display any user interface to the customer. Instead, C2 will let your software know that the user wishes to unsubscribe from a system, so that you will stop billing that customer.
C2 alerts your software about this unsubscribe event by GETting a URL from your web server. You may customize the format of this URL via your Platform Management screen, but a typical one might look like this:
https://yoururl.com/handleUnsubscribe/personid=#PERSONID#&systemid=#SYSTEMID#&apiPassword=#APIPASSWORD#
Notice that we pass your API password through the URL. We do this because the customer, and his or her web browser, is never part of this communication. Rather C2's server will communicate over https directly with your server.
It's important that you verify that the apiPassword which we send is correct. Remember, this password is secret, and customers should not know it. If you do not verify the password is correct, then it is possible for a malicious user to tell your billing system to stop charging him or her, even as he or she continues to receive trading services from your Private Platform.
Assuming the API password is correct, your software should turn off further recurring billing for this userid/systemid combination. You may also optionally use the Subscription API's endPlatformSubscription command to tell C2 to terminate subscriber rights to the system, either immediately, or at a time in the future. Finally, you should tell C2 the result of this "handleUnsubscribe" call. You do this by returning psuedo-XML in response to C2's GET. Your response to C2's handleUnsubscribe request should look something like this:
<c2xml>
  <status>
    <ok>1</ok>
  </status>
  <userResponse>
Your unsubscription will be processed shortly. We will send you an email when complete.
  </userResponse>
</c2xml>
Notice there are two important nodes within this XML response. First, the <ok> node, which contains either a 1 or 0. A 1 response tells C2 that the unsubscibe processing was successful on your side. The <userResponse> field is a html string that we will display to the user to tell him the status of his unsubscribe request (typically, a "You successfully unsubscribed" type of string).
Remember, it is your responsibility to turn off the subscription credit using either C2's endPlatformSubscription API call, or by manually adjusting the subscriber's subscription credit in the Platform Management screen.